Most people get a deep tissue massage gun wrong the first time. They find the sorest spot on their lower back, crank the speed to the top setting, and lean in until the muscle goes numb. Twenty minutes later they have a bruise the size of a coaster and a back that feels exactly as tight as it did before they started.
I have watched that happen in a clinic, on a patient who had been cleared for light recovery work, and I have done it to myself after a 30 mile ride in the Front Range foothills. The tool was not the problem. The routine was.
This guide is the routine. It covers which head to use, how much pressure to apply, how long to stay on each muscle, and where you are not allowed to point the thing. It also covers the two guns I would hand a rider for back and leg work, and how to test either one in the first week so you know whether the motor actually holds when you press down.
Why you should trust me
I have worked as a physical therapy assistant in a Denver sports rehab clinic for eight years, which means I spend my days with people coming back from crashes, overuse injuries, and training blocks that got away from them. I use massage guns with patients under the direction of the head PT, and on myself after long trail rides.
I have owned more than 20 guns. I keep a spreadsheet on every one: how the stroke holds under pressure, how loud it gets at the speed people actually use, how the battery behaves across a week of real sessions, and which ones died inside a year. I watched a cheap gun stall out on a patient's hamstring mid session once, and that is the moment I stopped trusting box copy. I do not recommend a gun without knowing how it behaves when you lean into it.
How I picked and how I tested
I judge a massage gun on four things: stall force, amplitude, noise at the speed people actually use, and battery life under real sessions. RPM is the number brands print in the biggest font on the box and it is the number I care about least. A gun that taps fast and shallow is a buzzer. A gun that thumps deep and holds its stroke is a recovery tool.
The two guns in this article are newer listings, and neither one publishes a stall force figure, which is the first spec I look for. So I am not going to pretend I ran them through a full Colorado riding season. What I can tell you is how they are built for back and leg work, what the design tells you about the motor, and how to test the pressure question yourself in about two minutes.
Here is the test I run on any gun I pick up. Turn it on at a middle speed, press the head into a couch cushion, and slowly lean your weight in. If the stroke keeps cycling at the same pace, the motor has headroom. If it slows, flutters, or quits, that is your ceiling, and it is lower than your quads will want on a Sunday morning.
Second test: set it to the speed you would actually use on your back, usually the second or third setting, not the top one, and hold it at arm's length. If you would not use it in a shared living room at that volume, it becomes a paperweight no matter how strong it is.
The two guns worth using for back and leg work
Both of these sit in the same entry level band, and both are aimed at the same job: getting blood moving through big muscle groups you cannot easily reach or work by hand. The difference comes down to head selection versus reach.
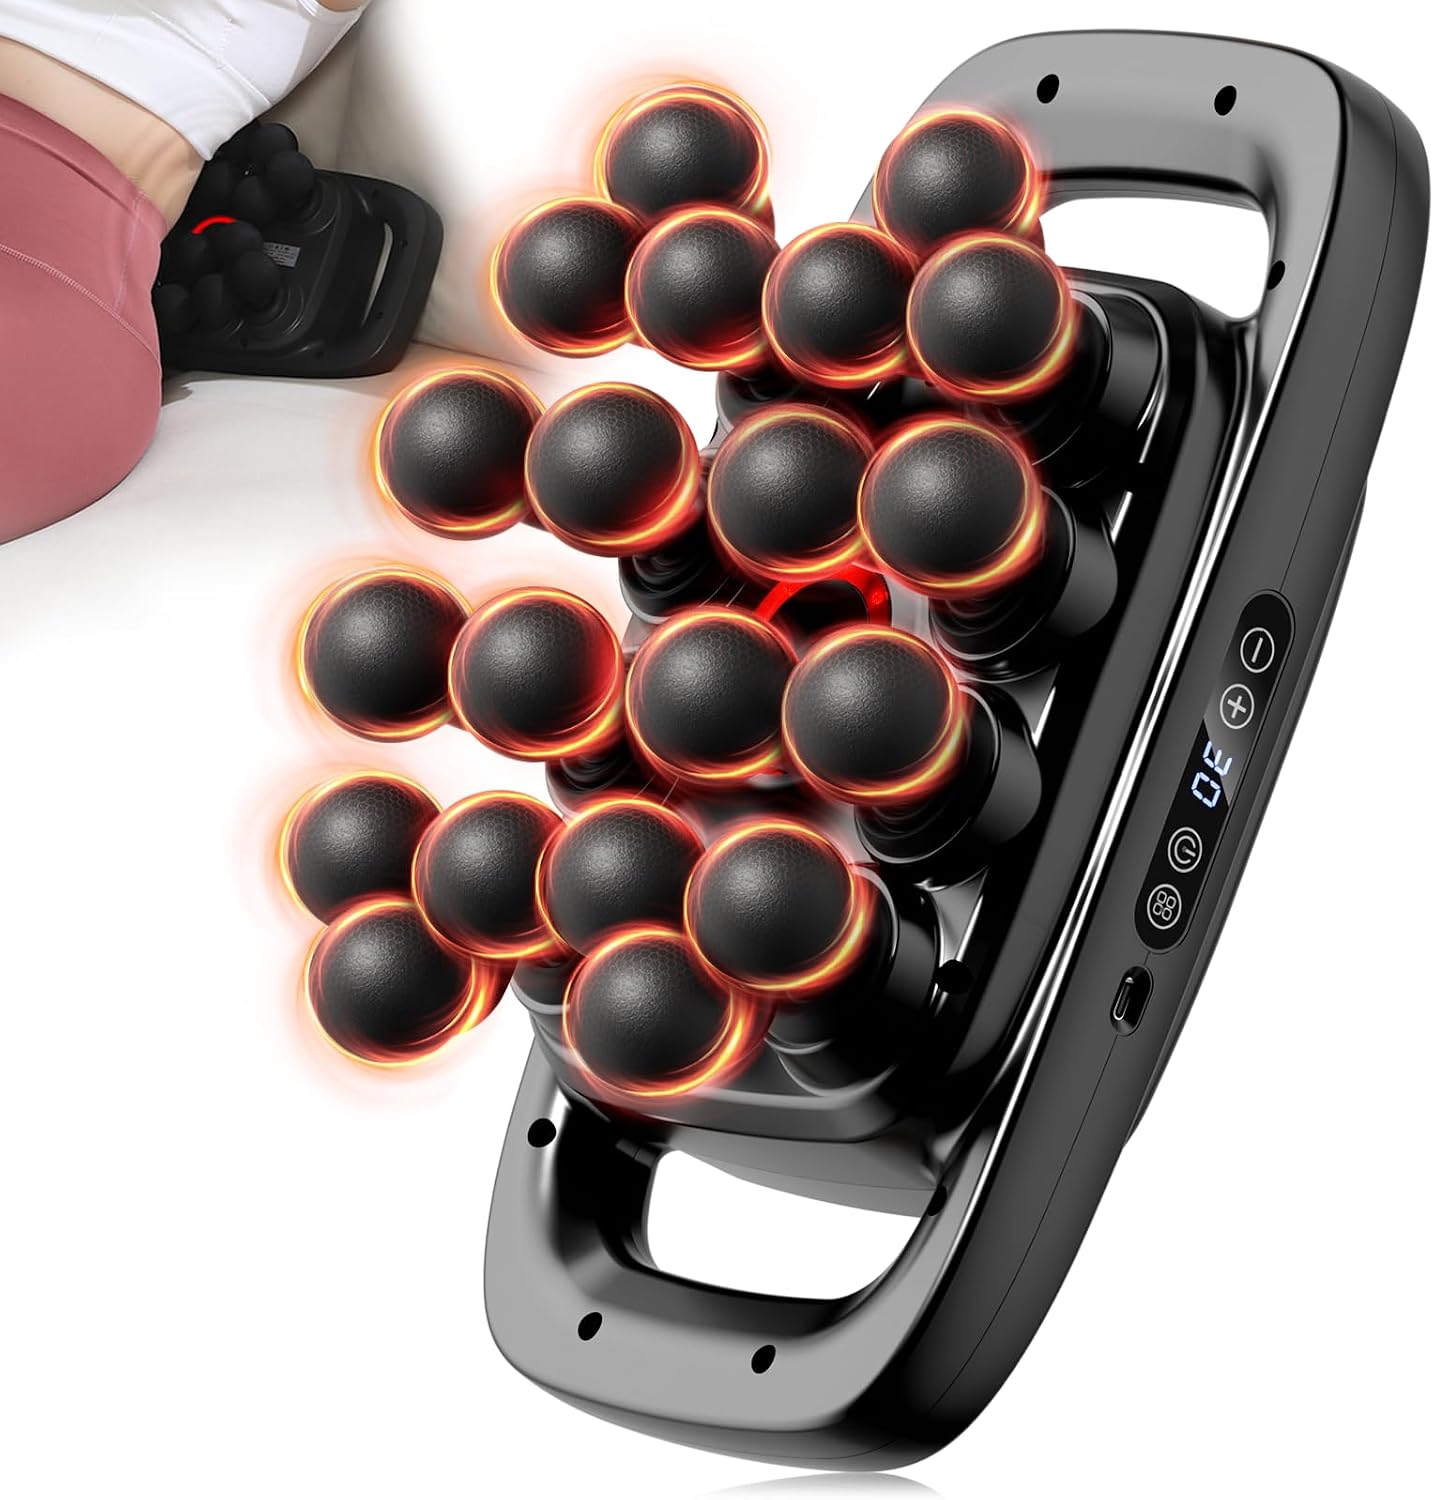
Best for back and legs: 20-Head Massage Gun Deep Tissue for Back and Legs, 3 Modes, 30 Levels
 Visit on Amazon →
The reason to pick this one is the head selection. Twenty heads sounds like a gimmick until you are actually working a back and a pair of legs in the same session, because those jobs want different contact points. A broad flat head spreads pressure across a quad or a glute without digging in. A round ball head is what I reach for along the erectors beside the spine and down the hamstring. The smaller, more pointed heads are for the strip along the outside of the thigh and for getting around the shoulder blade, and they are also the heads most likely to bruise you if you use them at high speed.
Three modes and 30 levels gives you finer control at the low end than most guns at this tier, and the low end is where back work lives. On a back, you want the slowest setting that still produces a clean, even thump. Most people never touch level 30 on their own back, and that is correct.
Flaws but not dealbreakers: Twenty heads is a marketing lever, and you will use maybe five of them. The rest live in the case. The real question with any gun at this tier is whether the motor holds when you press, and that is exactly what the cushion test tells you on day one. Run it before you get attached.
Anyone who wants one gun that can handle a full back and leg routine without buying extra attachments should start here.
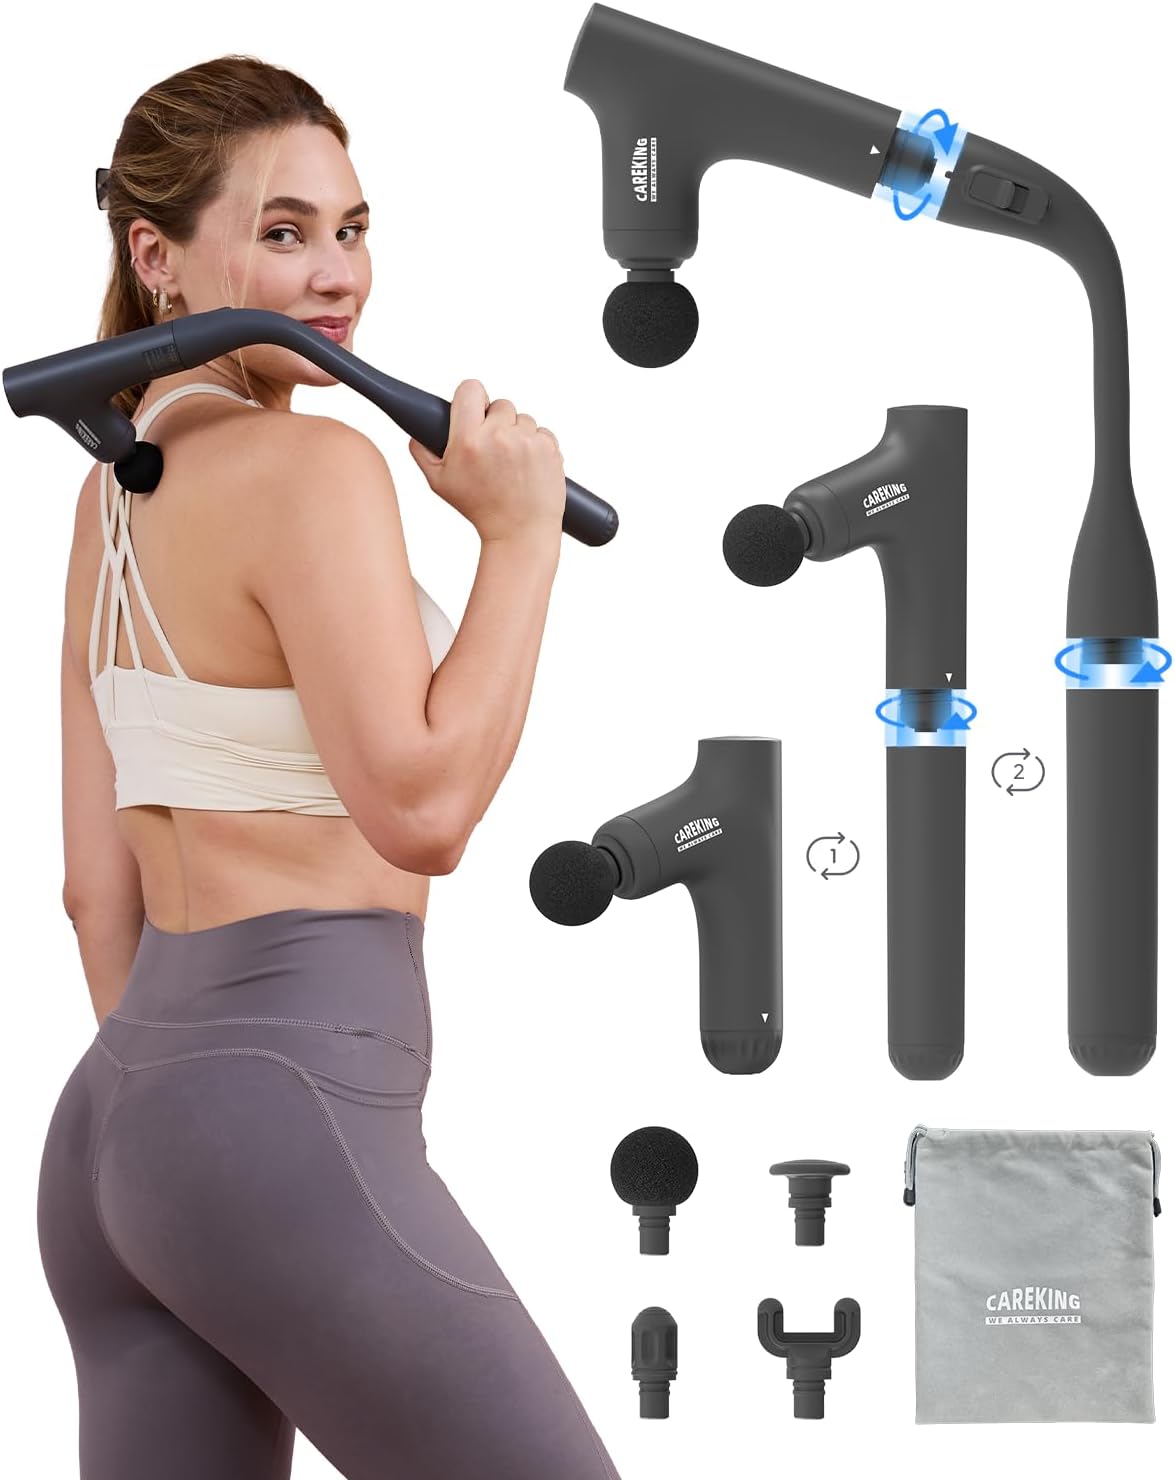
Best for reaching your own hamstrings and calves: 3-in-1 Detachable Massage Gun Deep Tissue with Extension Long Handle
 Visit on Amazon →
Reach is the whole point of this one. Your hamstrings and calves are the two muscle groups that most reliably need work after a long ride, and they are also the two hardest to reach on yourself without twisting into a shape your low back will complain about later. The extension handle lets you stand upright, keep your spine neutral, and still put the head on the back of your thigh.
The detachable design is the part I like. With the extension on, you get the long reach for hamstrings, calves, and the middle of your back. Take the extension off and you have a compact gun you can toss in a bag for a weekend trip, which is more useful than a second full size unit sitting in a drawer.
Three in one usually means the handle converts, so expect to spend a minute learning the balance point before your first session. A long handle puts the motor weight further from your hand, so start at a low speed and get used to the swing before you go up.
Flaws but not dealbreakers: Every inch of handle is an inch of leverage, and leverage cuts both ways. It is easier to reach your hamstring, and it is also easier to accidentally drive the head into a spot harder than you meant to. Keep your grip loose and let the gun do the work.
Anyone who trains legs hard and does not have a partner to work on them should look at this one first.
The routine that actually works
This is the part people skip, and it is the part that decides whether you get recovery or a bruise.
Step one: warm the muscle, do not attack it. Start at the lowest speed with a flat or ball head and move over the whole muscle belly for 60 to 90 seconds. You are not chasing a knot here. You are getting blood moving and letting the tissue wake up before you add pressure.
Step two: pick the head for the job. Broad head for quads, glutes, and the big meat of the calf. Ball head for hamstrings and the erectors beside the spine. Pointed heads only for small areas and only at low speed, and never on the back.
Step three: speed down as pressure goes up. This is the rule that prevents most bruising. If you want to press harder, drop the speed. A slow, deep thump does more for a tight quad than a fast, shallow rattle, and the fast rattle is what leaves marks.
Step four: work along the muscle, not on one spot. Move the head in slow, overlapping passes up and down the length of the muscle belly. Thirty to 60 seconds per pass is plenty. Parking the gun on the single sorest point for five minutes is how you end up sore in a new way tomorrow.
Step five: keep it short. Two minutes per muscle group, 10 to 15 minutes total for a full back and leg session. More is not better. The gun is a warmup and recovery tool, and the recovery happens after you put it down, not while you are holding it.
Step six: stay on muscle bellies only. Never on bone, never on joints, never on the spine itself. For the lower back, work the columns of muscle two finger widths off either side of the spine, and keep the pressure light. For the knee, the elbow, the shin bone, and the front of the neck, the answer is no.
Step seven: move afterward. Stand up, walk around, do a few easy reps. Percussive therapy gets blood moving; movement is what makes it count.
Where people go wrong
The first mistake is going straight to maximum speed. High RPM with no amplitude behind it is vibration, not deep tissue work, and vibration at high speed on a tight muscle is a recipe for a bruise.
The second mistake is pressing until it hurts. If you are gritting your teeth, you are past the useful range. Recovery work should feel like a firm, even pressure you could fall asleep under, not a challenge.
The third mistake is chasing a diagnosis. A massage gun does not fix anything. It does not break up scar tissue, it does not release a trigger point forever, and it does not treat an injury. What it does is help a muscle feel better and move better so your body can do its own job.
The fourth mistake is using it on a fresh injury. If something is swollen, hot, sharp, or numb, the gun stays in the case. That is not what it is for.
When the gun is the wrong tool
If you have sharp pain, pain that shoots down a leg, numbness, tingling, or swelling, put the gun down and go get evaluated. Same for anything that hurts more than a day after a session. A massage gun is a recovery and relaxation tool. It is not a treatment device, and no amount of amplitude changes that.
The other case is the spine itself. You can work the muscles along the back, but the bones of the spine, the ribs near the surface, and the front of the neck are off limits. That is not a disclaimer. That is anatomy.
How to test a new gun in the first week
Run the cushion test on day one, before you get used to the gun's personality. Press it into a couch cushion at a middle speed and see whether the stroke holds. That tells you more about the motor than any spec sheet.
Then do three real sessions in the first week, one on your quads, one on your hamstrings, and one on your calves, and log two things: how loud it is at the speed you actually used, and how much battery you burned. That gives you a realistic read on whether the thing will survive a normal training week, which is the only battery claim that matters.
Last, check the reach. Sit on the floor with your leg extended and see if you can comfortably get the head onto the middle of your hamstring without rounding your low back. If you cannot, the extension handle is the fix, not more practice.
What this all costs
Both of the guns here sit in the same entry level band, so the decision is not about money, it is about which problem you have. If your back is the main complaint and you want a head for every job, take the 20 head gun. If your hamstrings and calves are the problem and you work on yourself, take the one with the long handle.
Check current Amazon price on each before you decide, and check it again before you buy, because this tier moves around a lot.
The gun is the cheap part. The 15 minutes you spend on a routine, three or four times a week, is what changes how your legs feel on a Sunday morning. Pick one, learn your own pressure limits, and keep it on muscle bellies.